Friday, November 13, 2015

Salted Caramel Apple Cake

I believe that Fall is my favorite time of the year not only because of cooler weather and the gorgeous colors but because of the wonderful flavors we are lucky to enjoy.
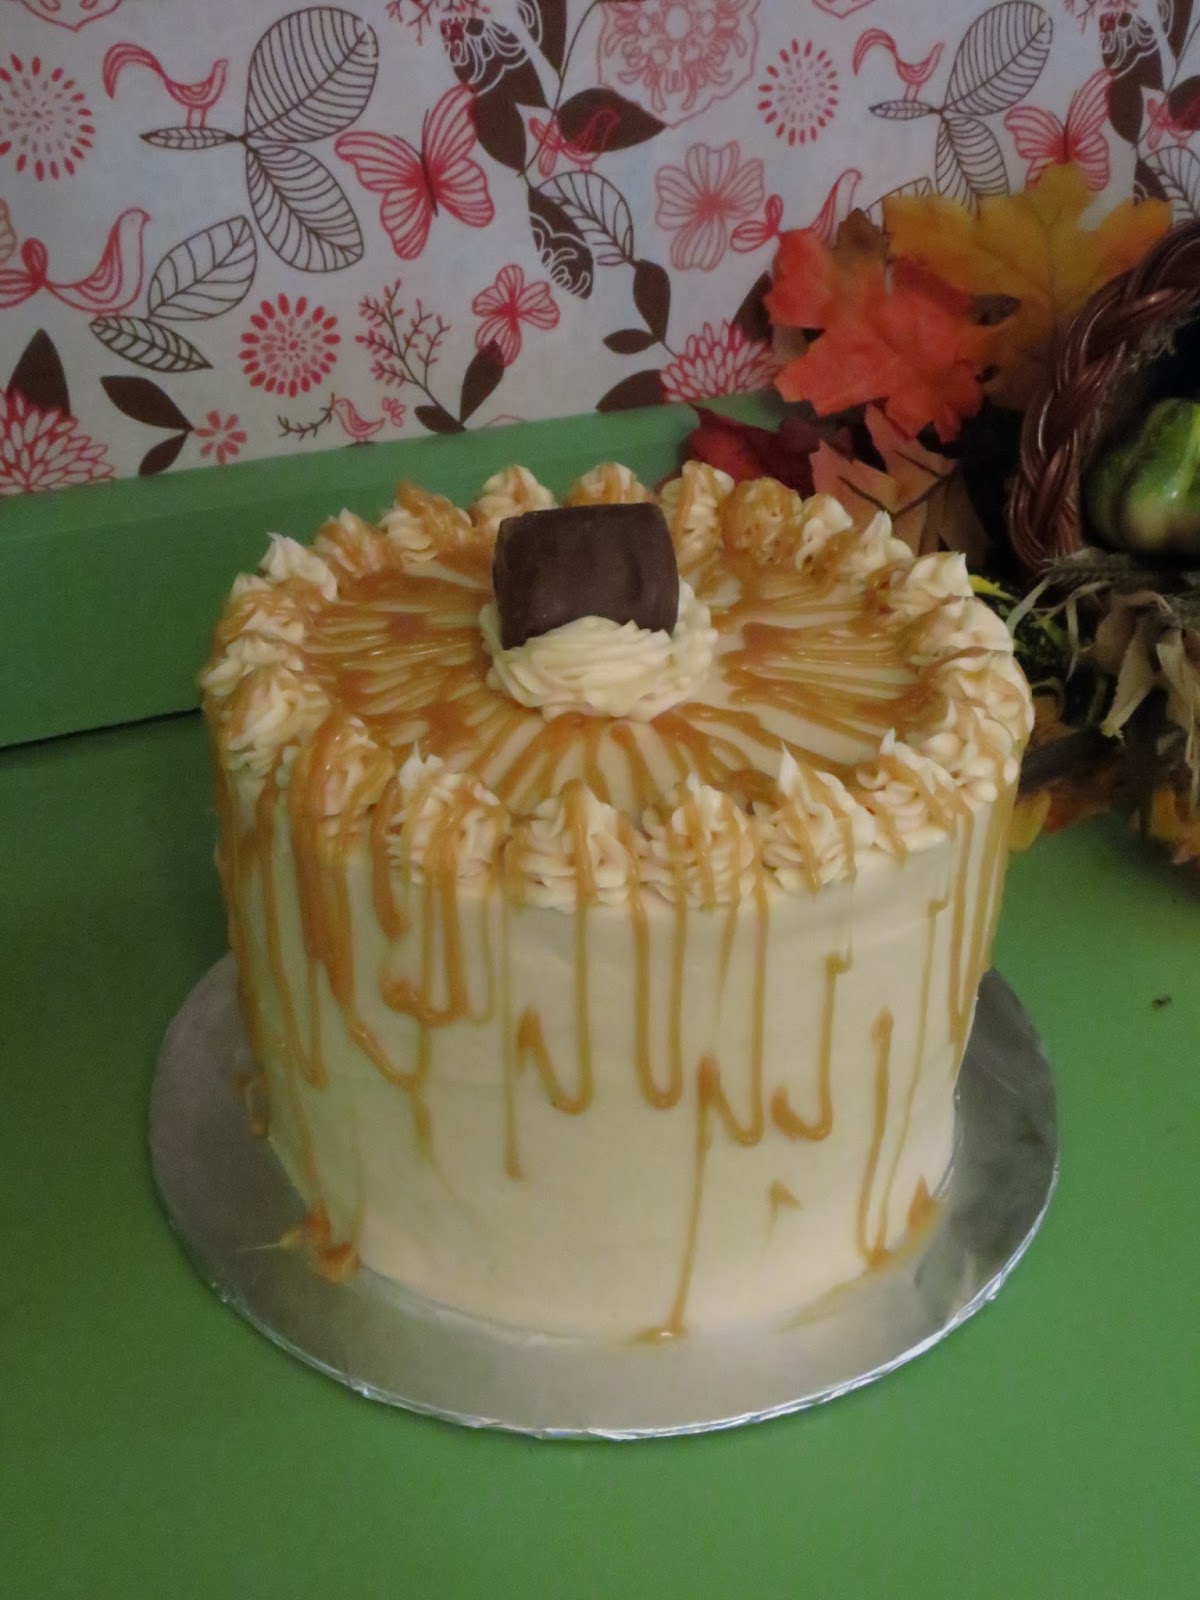
This cake is all about Fall and I just love it: Salted Caramel Buttercream hugging an Apple Cinnamon Cake with salted caramel drizzled over the top.

Apple Cinnamon Cake
Adapted from: "Crazy about cupcakes" Krystina Castella
1 c brown sugar
1/2 c vegetable oil
2 tsp cinnamon
1 tbs vanilla extract
2 eggs
2 c flour ( I use half all purpose and half cake flour)
1 tbs baking powder
1/2 tsp salt
2 med. Granny Smith apples (peel and graded)

Directions:  Over 350
1. Blend Brown sugar, veggi oil, cinnamon, and vanilla till well blended
2. Add eggs one at a time and make sure to scrape side of bowl
3. Mix flour, baking powder, and salt together then slowly add to the wet mixture.
4. Peel your apples and then with a cheese grader, grade the apples and then add to cake batter.  Mix well together.
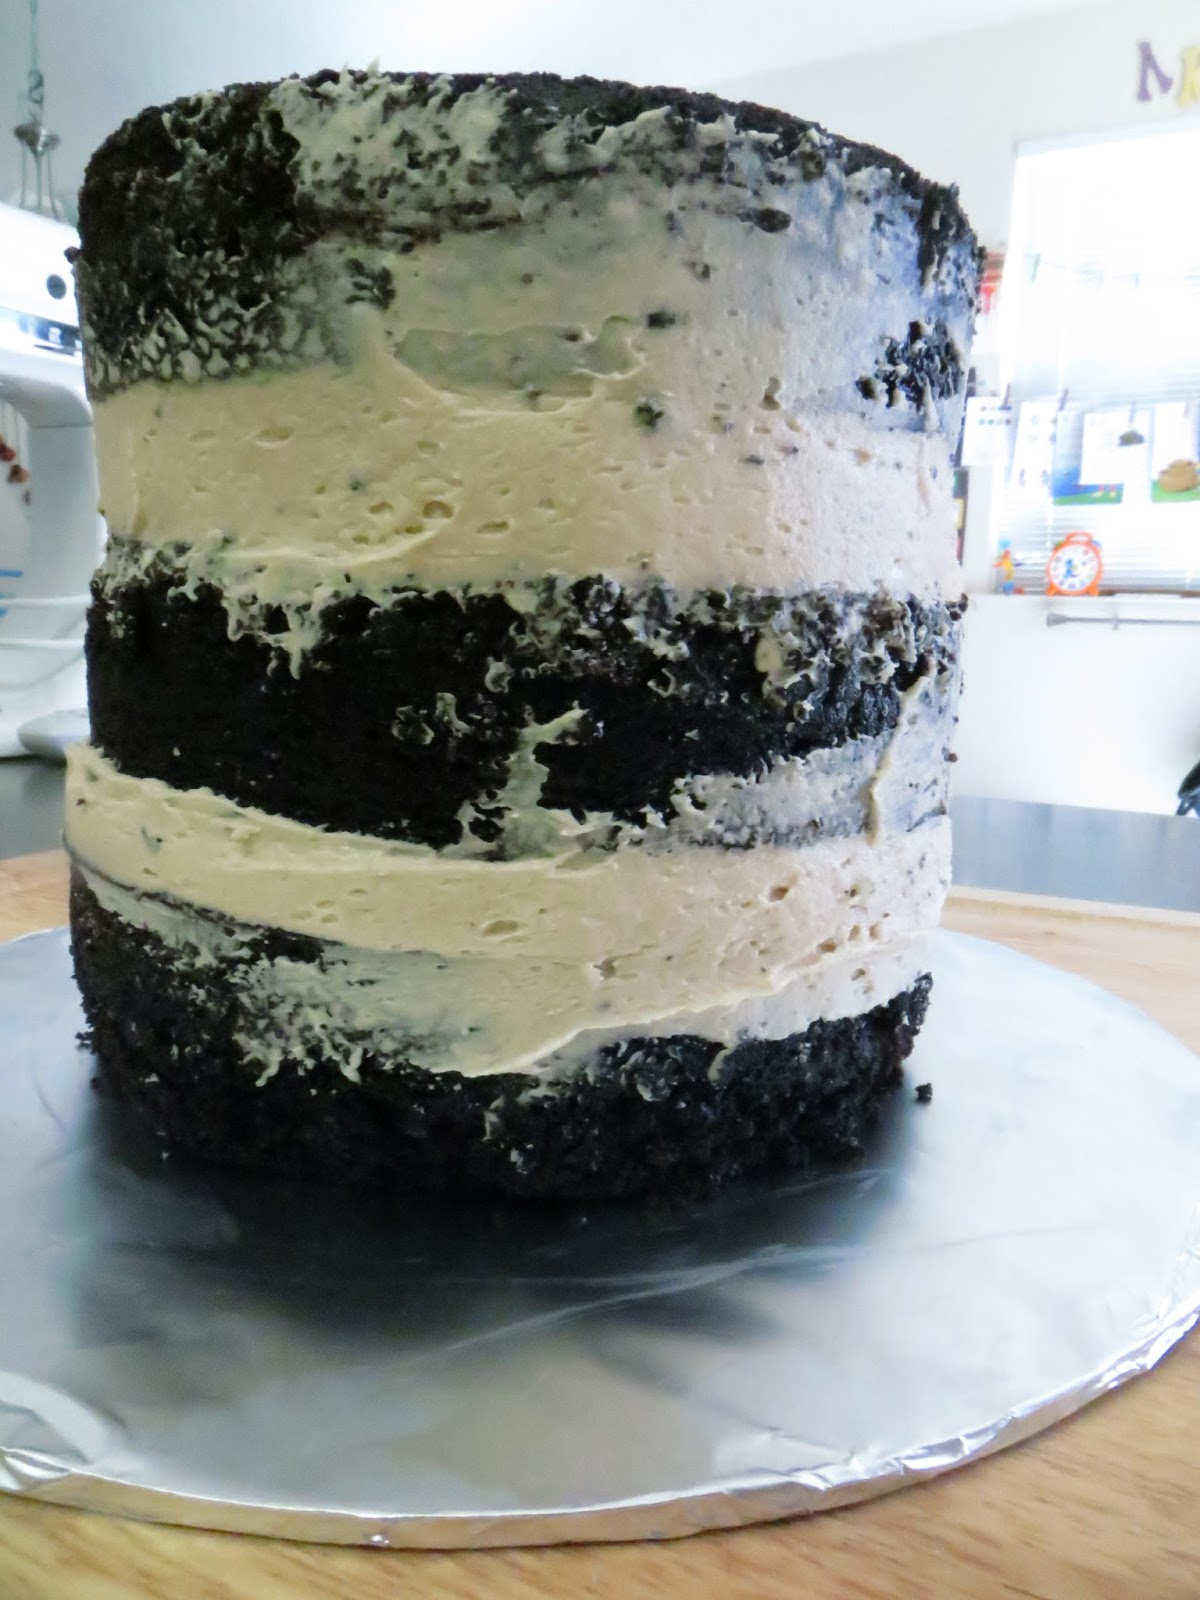
5. You will want to bake two cakes with your batter therefore equally separate and bake your cake. 
(tip for getting your baked cake out of the pan easily:  Spray cake well with spray oil, Trace your pan onto parchment or wax paper, cut out the drawing and place into the bottom of your pan.)
6. Bake your cakes for 25-30 minutes or until the middle is cooked through.
7.  Once removed from the oven allow cool for 5 minutes, run a knife around the edge and tip over onto a cooling rack.  The cake will come out with ease if you followed my tip.
8. Place in fridge to cool while you make the frosting

So I am not very good at making homemade caramel.  I have tried a few times and will try again but for this cake I decided to use a store bought caramel to make sure I did not mess up the buttercream part of the frosting. But if you would like to make your own caramel you will find many great recipes on pinterest.
Salted Caramel Buttercream Frosting
1/2 cup softened unsalted butter
8 oz salted caramel sauce 
1 tbs vanilla extract
4 cups shifted powered sugar
4-6 tbs heavy whipping cream

Directions:
1. With your whipping attachment cream the butter, caramel, and vanilla for 3 minutes. Scraping the sides a couple times.
2. Add powder sugar and Heavy cream slowly with the mixer on the slowest setting.  Once all is added scrap sides and put mixer on med. for 2 more minutes.


Putting the cake together:
1. Layer of cake on the cake board then pipe a 1 inch layer of frosting over the whole top.  Spread out evenly over the top for a smooth layer and then add the other layer of cake on top.  Smooth out the sides of the cake and frosting layer then place into fridge to stiffen up the frosting.
2. Once the filling is stiff put a crumb coat of frosting around the whole cake and the top. Allow to sit for a couple moments then frost whole cake with a nice layer of frosting. Smooth out as best as you can.
(tip for smoothing: After frosting is put on the thickness you like allow it to set for a few moments.  Then fill a cup with very hot water, have a few paper towels at hand, and your metal cake spatula. Dip the spatula into the hot water and then wipe off with a paper towel. Slowly run the edge of the spatula around the cake.  Re-dip and repeat until you are happy with how it looks. This will take much practice to get it how you like it so do not give up)
3.  Using a piping bag with tip 224, pipe the little dollops around the edge of the top. Place cake into the fridge to stiffen
4.  Make the caramel drizzle:  Once again I have not mastered the homemade caramel sauce so I do it the easy way.  Buy Caramel baking candies.  In a sauce pan place a handful of caramel candies and 3 tbs of heavy whipping cream. ON a very low heat melt the candies and mix the cream into it.  Once all melted take the pan off the heat and add course pink or white salt grains a few pinches.  Once the caramel sauce has cooled down for about 5 minutes scoop into a gallon zip bag. Cut the corner off and drizzle over your cake.

This cake is full of fall flavors and class!!! Enjoy.

Thursday, November 12, 2015

Purple, sliver, and white wedding cake

 A four tier wedding cake and dozens of cupcakes.  The wedding colors where purple, silver, and white with flowers and butterflies.  I loved creating this cake so much with the Bride.
 The sliver trim on the bottom tier was made with edible paper and a paper decorative hole punch.  I bought the puncher and paper from Micheal's where you can find many different patterns. I attached it with edible sugar glue also bought from Micheal's cake section.  All the flowers and butterflies where made from Modeling Chocolate.  The sliver flower above was created with gray modeling chocolate and each petal was painted with edible silver luster dust mixed with Lemon extract.
 The second tier you will see is covered with a mosaic pattern.  These pieces where made with purple modeling chocolate and cut with a specialty cutter.  This pattern was created by http://www.jessicaharriscakedesign.com , She has so many fun and creative patterns to draw from.  The cutter came from http://www.notjustcakesbyannie.com , Here you will find many cutters for cake decorating.
 This Rose was my first successful Rose after so many failures and I was so super excited on how it turned out.  Making any flower practice is a true key in getting it right.  I learned how to make the rose by watching a handful of how to do videos on YouTube.  The name plate was cut out with a cutter I got from "Not just cake by Annie".
 The flavors of the cake and cupcakes where: Brownie cake filled with eggless Chocolate chip cookie dough, Chocolate cake filled with vanilla cheesecake, Chocolate chip cake filled with chocolate gauche,  Vanilla Cake filled with buttercream and berries.
 The Purple butterflies where made with purple modeling chocolate and a butterfly mold.  I bought this mold on Amazon.com.  It came with two different sizes of butterflies.
I felt for my first ever wedding cake this one will always be one of my favorites.

Wednesday, November 11, 2015

Snickers Cake

So my favorite candy bar is a snickers bar. So when I decided to make this cake I was excited to combine all these flavors together Chocolate.........Peanuts.......and caramel, oh my!!
Snickers Cake w/ a caramel apple on top
 Chocolate Cake: make three cake layers
adapted from:Hershey's Special Dark Cocoa

2 c. sugar
1-3/4 c all purpose flour (I do the 1 cup all purpose and the 3/4 c cake flour)
3/4 c special Dark cocoa powder
1 1/2 tsp baking powder
1 1/2 tsp baking soda
1 tsp salt
(mix all of these together in the mixer first)
2 eggs
1 c milk
1/2 c vegetable oil
2 tsp vanilla extract
(mix all of these together in a med. size bowl)
1 cup boiling water

Directions:  Oven 350 degree
1. Mix all the dry ingredients together in the mixer bowl.  Be careful it will spray every where if to fast.
2. Mix all wet ingredients in a med. bowl expect the boiling water.  Slowly add to dry ingredients until mixed well.
3. Add the boiling water very very slowly.
4. Pan preparation:  Spray pan with spray oil, line the bottom with parchment paper, then fill with cake batter. You will need to separate batter into thirds. 
5. Bake 30-35 minutes, remove from oven, allow to cool for 5 minutes, and then remove from pan. 

Cake layers with Peanut butter frosting filling


Peanut Butter Frosting:
1/2 cup softened unsalted butter
1 cup creamy peanut butter
4 cups shifted powder sugar
4-6 tbs heavy whipping cream

Directions:
1. Whip the softened butter in the mixer with the whisk attachment (about 2-3 minutes)
2. Add the peanut butter and whip (about 2 minutes) scrap the sides of the bowl
3. With mixer at the slowest speed Add one cup of powder sugar then 1 tbs of heavy whipping cream.  Continue till all sugar is gone.  If the frosting is super thick add at least one or two more tbs of cream.  Whip for another 2 minutes

Once Cake is completely cooled level the tops and begin to build: Cake, frosting, cake, frosting, and the last cake.   Smooth out the frosting around the layers and place into the fridge.


Remove the cake from the fridge and frost with a crumb coat first set back into the fridge for 20 minutes. Finish putting a nice layer of frosting all over the cake. Make a frosting boarder at the base of the cake.  Smooth it as best as you can or as much as you want and then place back in fridge while you make the chocolate sauce.

 Chocolate sauce:
2 cups of chocolate chips
1 cup heavy whipping cream

Place both into a double broiler  or into a microwave safe bowl.  Melt the chocolate slowly use a whisk and whip the two together until a smooth sauce has been formed.  Allow to cool on the counter for just a few moments.  If you allow it to stand to long it will harden and you will not be able to pour it over the top of the cake.
Take the cake out of the fridge and place on your turn table.  With a spatula pour chocolate sauce over the top of the cake.  You want it to drip down the sides and also have a smooth top.  Do not play with top to much or your frosting will start to mix into the chocolate and mess to the top.  Place into the fridge once again for an hour.
At this time it is time to chop a small handful of peanuts and then make the caramel sauce.

Caramel Sauce:
1/2 bag of caramel candies
3 tbs heavy whipping cream

Place both into a sauce pan and put the heat on low.  Slowly stir until the caramel is melted and mixed with the cream.  If the caramel sauce is to thick add 1-2 more tbs of cream.  You want a sauce that is smooth and able to pour.
Get your cake out once again (I promise we are almost done here!!!)
Slowly pour the caramel sauce over the top of the cake.  Do not use anything to spread of the top will start to melt away.  I find the caramel sauce is heavy so be careful to not make the topping to thick.  Sprinkle chopped peanuts over the top.  Once again place into fridge to help caramel to stiffen and cool down.  Ready to serve after and hour.


A hula Girl Party

Well, we have hit 5 years old and I do not know where the time has gone. Our Little Olivia is now a big girl or so she says.
This year Olivia truly wanted to visit Hawaii but we just could not fit that trip into our budget or schedules so we decided a Hawaiian themed party would be perfect.  It was a great party and Olivia loved it especially when she found out her Daddy had hired a couple Hula dancers to come and teach the party attendants how to dance.

We had a handful of fun party games also but I forgot to take good pictures so I will try to explain what we did.
1. Javelin Throw: I cut up a couple pool noodles as the javelins and hung up a hula hoop.  They had to throw the javelins through the hoop.
2. Coconut Bowling: I got a small round coconut (not easy many of them are not so round. :)) The pins where water bottles that I dyed the water blue to look like ocean water.
3. Hula Hoop contest: Who can keep the hoop going the longest
4. Bean bag throw:  I had three sand buckets that where at different distances.   Bean bags where thrown into the buckets for points.
The kids loved the games and the Dancers.

Every Party we try to have special things for each of the guests: this party our guests where greeted with grass skirts and leis to put on as they entered the door.  To get into the party room they had to go through a big grass skirt that was made out of a plastic table cloth.  I cut little strips to make it look like a grass skirt and it was a fun party decoration.


The kids table was set with little table decorations that I purchased from Oriental Trading Company along with the colorful coconut drinking cups. For our drink station I made Hawaiian punch:
1 jug of Hawaiian punch drink
1 jug of sprint
little scoops of raspberry or strawberry sherbet
( a trick I learned with the sherbet for punch: use a melon baller or cookie scoop, an hour or more before the party scoop out many little balls onto a freezing cold cookie sheet, keep in freezer till just before the party. This is a quick way to add the balls of sherbet just before its time to party)


    Now we have the food table the most important part of a fun party.
 We did finger foods this party instead of a whole meal.  We had Hawaiian pizza, Hawaiian ham and cheese melts, fruit, veggies, and pineapple salsa with chips.  The treats where palm tree sugar cookies, Mini pineapple upside down cakes, and Chocolate cake.

Pineapple Upside down cakes came from:
www.toprecipeblog.com/2014/03/mini-pineapple-upside-down-cakes.html


Pineapple Salsa:
1 Fresh Pineapple                       1/2 onion
2 Roma tomatoes                       1/2 bunch of cilantro
1 lime                                           salt to taste
Chop all ingredients except the lime and mix together.  Juice the whole lime into the salsa mixture and add about 1 tsp of salt.  Mix again and let set in the fridge for an hour.  Taste the salsa with a chip if you need to add salt do a little at a time till the taste is to your liking.


Our cake this year was a two tier chocolate mint cake with a chocolate ganache filling and butter cream frosting.  The bottom tier was to emulate a grass skirt and the top was the water of the ocean.  The flower Lei and girl were created out of modeling chocolate.  

Chocolate Mint Cake:  The recipe is off the back of the Dark Chocolate Coco tub.  This recipe I have found to be one of the moistest Chocolate cakes I have ever made.  Instead of vanilla extract in the cake I substituted Chocolate mint extract purchased at a specialty cake shop.

Happy 5th birthday to my dear girl Olivia.
The Olivia Pictures where taken by Momma Mea Photography


Saturday, March 21, 2015

Is it a Bird or a Plane?.......no its Super Man


I love getting to do boy cakes because its great practice for when my baby boy gets old enough for birthday parties.  This Super Man cake was my first cake that I had to cut into a shape and boy was I worried about how it would turn out.  But as you can see it turned out pretty awesome.
Here is the how to:
1.  Colors of frosting needed: white, blue, yellow, red, and black  (I used Butter Cream)
2.  The Super Man symbol: I used my Silhouette cutter/ program but you can also print off the symbol and then cut out. 
3.   Cake: 12 inch square cake pan and a double layer cake with a filling.  Allow the cake and filling to set in the fridge for a couple hours.  This will help the cake to stay firm when cutting into the shape.
4. Take to shape of the symbol and pin it onto the cake.  As you can see I used tooth picks to keep the symbol in place.  Use a bread knife and saw along each line carefully.  

5.  Time to crumb coat the cake with white frosting.  This is a very important step after cutting a cake into a shape.  Cover whole cake with a very thin layer of white frosting and place back into the fridge. ( You will be putting the cake into the fridge many times so be ready. :) )
6.  Time for the Blue frosting:  Cover the sides with a nice layer of blue frosting.  Smooth out as best as you can. (tip: I use a cup of very hot water, paper towels, and a frosting spatula.  Dip the spatula into the hot water and then dry on a paper towel.  Slowly run the hot spatula edge along the side of the frosted cake to smooth out.)
7.  Add a blue boarder along the bottom edge of the cake.

8.  Cover the top or face of the cake with yellow frosting.  Smooth out and place into the fridge for twenty minutes.
9. Now take the symbol and lay on top of the cake.  I used a tooth pick and traced the out line into the yellow frosting. Place into the fridge for five minutes to help harden the frosting once more and then slowly peal off the paper symbol.

10.  Place the red frosting into a piping bag and fill in the portions of the symbol that are red. Smooth out.  I printed off a picture of the symbol so I could see exactly what should be red.
11.  Place black frosting into a piping bag with a #5 tip.  Outline the red with the black to complete the symbol.  Place into the fridge to set the frosting.

Thursday, March 19, 2015

Grasshopper Cupcakes (St. Patrick's Day)

Grasshopper Cupcakes

When I was in College my mom would always order me an Ice Cream cake or pie from Baskin-Robins for my Birthday.  One year I got a grasshopper pie which was one of my most favorite combinations of flavors, Chocolate and mint. So this year for St. Patrick's Day I wanted to make a cupcake with those flavors.....you have to have green for the day so it was perfect.  This cupcake has three different components: cake, chocolate shell, and frosting.
You will make these and then not want to share with another soul or maybe that is just me when I want CHOCOLATE. :)
Be ware these are so yummy and dangerous.......Happy baking
Dark Chocolate cake
(recipe comes from Hershey's Special Dark Cocoa tub)

2 c. sugar     
1 3/4 c. All-purpose flour
3/4 c Hershey Special Dark Cocoa
1 1/2 tsp. baking soda
1 1/2 tsp. baking powder
1 tsp. salt
2 eggs
1 c. milk
1/2 c. veggi oil
2 tsp. coffee extract or vanilla extract
1 c. boiling water

1. Heat oven to 350 degrees.   2. Stir together all dry ingredients    3. Add eggs, milk, extract, and oil: mix well.   4. Slowly stir in boiling water (batter will be thin)   5.  Scope 1/4 cup batter into prepared cupcake wrappers.   6.  Bake for 15 minutes    7.  Allow to cool before moving to next component.

Chocolate Shell

1 cup Dark chocolate chips
3 Tablespoons of heavy whipping cream

1.   Place into a microwave bowl and cook for 1 minute
2.   Stir until a smooth chocolate sauce is formed
3.   Dip top of cooled cupcake into the chocolate sauce
4.   Place into the fridge to help the Chocolate form a shell

Mint Butter-cream Frosting

1/2 lb or 2 sticks unsalted butter, softened
1 tablespoon of mint extract
6 drops of green food coloring
4 c. shifted powder sugar
3 tablespoons heavy whipping cream

1. Use whipping attachment on mixer and whip butter, extract, and food coloring for four minutes
2. Slowly add in powder sugar and cream until well mixed.
3. Turn on high and whip for 2-3 minutes
4. Top cupcakes and eat!!

Saturday, March 14, 2015

Mario Brother screen shot cupcakes

I was asked to create Mario themed cupcakes for my friends little man.  I was lost on how to make cupcakes without using paper inserts, so started my search  online.  I came across a group of screen shots that were a great inspiration.  With these screen shots I drew out my design.


There are 36 cupcakes in this display.  I used blue modeling chocolate and a 1" circle cutter to make the background bases. All the other designs in the screen shot were also created out of modeling chocolate.  They were attached with a little corn syrup painted on the backs and lain onto the blue circles.  I allowed these circles to sit out a couple days to firm up to hold its shape while on the cupcake. They lay on top of a cookie sheet and parchment paper dusted with corn starch.
Once the circles have sat a couple days place them on top of lightly frosted cupcakes which are already lain out in the pattern 6 by 6.  Then you will have a fun and unique screen shot display.